Friday, April 19, 2024

Just Add Ink #698 - Choose Two

It's a choose two challenge this week at Just Add Ink and the options we're giving you are


I chose flowers and leaves for a clean and simple watercoloured card. 


I embossed my stamped image, which gives a nice border when I'm watercolouring, and used my Zig real brush markers. I absolutely love these markers but you do have to be choosy with paper as they don't blend well on all brands. Here I used Ranger's distress watercolour card, stamping on the smooth side. 

Materials used:
  • stamps - Caring Thoughts/Dear Friend (Simon Says Stamp)
  • card - distress watercolour (Ranger), gorgeous grape (Stampin' Up)
  • other - Dimensionals, MISTI, Wordies Sentiment Sheets - Everyday (Creative Expressions), craft foam, water brush, clear embossing powder, heat tool, Zig Clean Color Real Brush Markers, black ink

We'd love you to get out your own flower, leaf and pot supplies, create and share on the Just Add Ink blog. Head on over to see the lovely samples my team-mates have made to inspire you.

Thanks for stopping by.

Cheers
Kerry

Thursday, April 11, 2024

Dancin' Birthday Dragon

The Color Throwdown people have given us another gorgeous combo to play with, nice and bright and cheerful. 


Rather than a birdie, I went for another creature that flies - and dances!


I've done some ink blending on the dragon, stencilled clouds behind and stamped on my background piece. In case you're not familiar with this die, the head and body are attached separately and the body swings from side to side in a dance. I did take a short video to show you but Blogger is being uncooperative. It worked on my instagram, so click here and scroll to the second image.

Materials used:
  • stamps - You Matter background stamp (Simon Says Stamp)
  • card - basic white, lemon lime twist (Stampin' Up)
  • dies - Dancin' Birthday Dragon, Essential Arches (both Spellbinders)
  • distress inks - kitsch flamingo, picked raspberry, squeezed lemonade, mustard seed, spun sugar
  • other - cloud stencil (My Favorite Things), blending brushes, lemon lime twist and crushed curry markers (SU), mounting foam tape, craft foam, MISTI, Big Shot, Wordies sentiment sheets - Everyday (Creative Expressions) 

Thanks for calling in. Have a dancin' day!

Cheers
Kerry 

Wednesday, April 10, 2024

The Card Concept #206 - April Flowers

Thanks for joining me for another challenge with The Card Concept. Hopefully our options will inspire you to create, whether it's for a birthday, wedding/anniversary, friendship, Mother's Day or perhaps just a 'thinking of you'. 


My clean and layered card was inspired by the gorgeous pink flowers.


My process was perhaps slightly different: I stamped the flower image first so I could then hold the background stencil over it and find what I considered the best layout to suit the stamp. With the stencil in place I coloured my pale blue background with dye ink, not worrying too much if I went over the stamped image because I knew I'd be using oxide inks to colour that, and they would colour over dye ink. Once the background was done I cut with the postage die and then used stencils to colour the image. Next I added the postage stamping, coloured my background piece, and die-cut a sentiment to fit perfectly within the delineated area, using vellum for the shadow so the stamped images beneath could still be seen.

Materials used:
  • stamps - Garden Roses and matching stencils (Pink Fresh Studio), Postage Collage (Waffle Flower)
  • card - distress white heavystock, vellum
  • distress oxide inks - tattered rose, worn lipstick, picked raspberry, shabby shutters, peeled paint
  • other - Postage Collage coloring stencils (Waffle Flower), blending brushes, MISTI, Blueberry ink (Altenew), Miss You die (stash), mounting foam

Check out my fellow team mates' offerings over on the Card Concept blog and don't be shy to share your own creations with us.

Thanks for calling in.

Cheers
Kerry

Tuesday, April 9, 2024

Practically Perfect

This week's Inspired by...challenge caught my eye. 

Umbrellas immediately made me think of Mary Poppins. Anyone else or is it just me? 😉 No? Ok then, lol. Showing my age I guess. Well anyway, once I had the thought, of course it wouldn't leave me alone, so eventually I sat at my craft desk and made a card.

The sentiment was done on the computer (if you know of a stamp set that says this, please let me know!) and I tried to match the font styles from the movie as well as I could, lol. I cut a number of Mary Poppins' in different colour card and cut and layered them, setting them on a simple inky background. The little red bow tie is one of the kite ribbons in the die set and I used markers to colour her hair and flower. And of course I couldn't leave out the iconic parrot head on the umbrella, so I printed a teeny one of those too. 

Materials used:
  • card - white, black, blush, blue, red
  • dies - The Park (Tim Holtz), stitched rectangle (Paper Rose)
  • other - blending brush, Dimensionals, craft foam, Big Shot, markers, blue ink

Hope your day is practically perfect! Thanks for stopping by.

Cheers
Kerry


Sunday, April 7, 2024

No Matter What, No Matter How

It was my elder daughter's birthday yesterday and she always asks for handmade things from me - you may remember the Harry Potter piece I made her a while back. This time around it's a general reading theme, a passion I have in common with both my girls, I'm thankful to say.

It's a shadow box and I've used a number of items from Stamperia's Vintage Library collection.


The main focus is the book pages. I used modeling clay and a mold to make the 'books', which I then painted and swiped with gold wax. I toyed with adding more to the sentiment - the words I've used for my header, in fact: no matter what, no matter how. I firmly believe it doesn't matter what you read - be it comics, graphic novels or books of any genre - and it doesn't matter how you read - physical books or e-reader - the most important thing is just that you read.


There's a few layers of pages, which I've shaped a bit and separated, though they are held in place.


And there's a little visitor hiding in the corner.


I stuck him a bit low down, forgetting some of that corner would be obscured by the framing once it was in place, but oh well, lesson learned. He was glued on way too good to move him, lol. Luckily DD didn't mind.

If you're an avid reader too, hope you enjoy! Thanks for stopping by.

Cheers
Kerry

Friday, April 5, 2024

Just Add Ink #696 - Inspiration

Welcome back to another Just Add Ink challenge where this week we're offering an inspiration picture to help rev up your creativity. And a mouthwatering pic it is too - take a look:


How delicious does that look? Mmmmmmmm...

As my daughter has a wedding to attend in a couple of months, I picked that for the theme of my card.


Materials used:
  • card - basic white, retired designer paper (Stampin' Up)
  • dies - Celebrate colorize, Crochet (Tim Holtz), Curio Spring Findings (The Greetery), Congrats (stash)
  • Copic markers - BV00, BV11, V09, BG11, BG34, C2, C4
  • other - pearls, Dimensionals, craft foam, shaping mat and tool, flower punch

Everything was cut from white cardstock and coloured with Copics and I went for an ombre kind of effect on the 'congrats', which is two layers for added depth. The flowers were shaped before being glued on and as you can see, the colours in the pic inspired my palette too. I stuck a row of pearls along the edge of the crochet trim to match with the flower centres. 

With my daughter's birthday tomorrow and mine yesterday, we're treating ourselves to a high tea today, so there will most definitely be cake! I hope you have some yum in your day too and thanks for stopping by.

Cheers
Kerry

Friday, March 29, 2024

Just Add Ink #695 - Just Add Chocolate

It may not be my week to create for Just Add Ink but there was no way in the known universe I would miss the opportunity to ...

I mean, come on! ðŸ˜‚😉 CHOC. O. LATE.!!! 

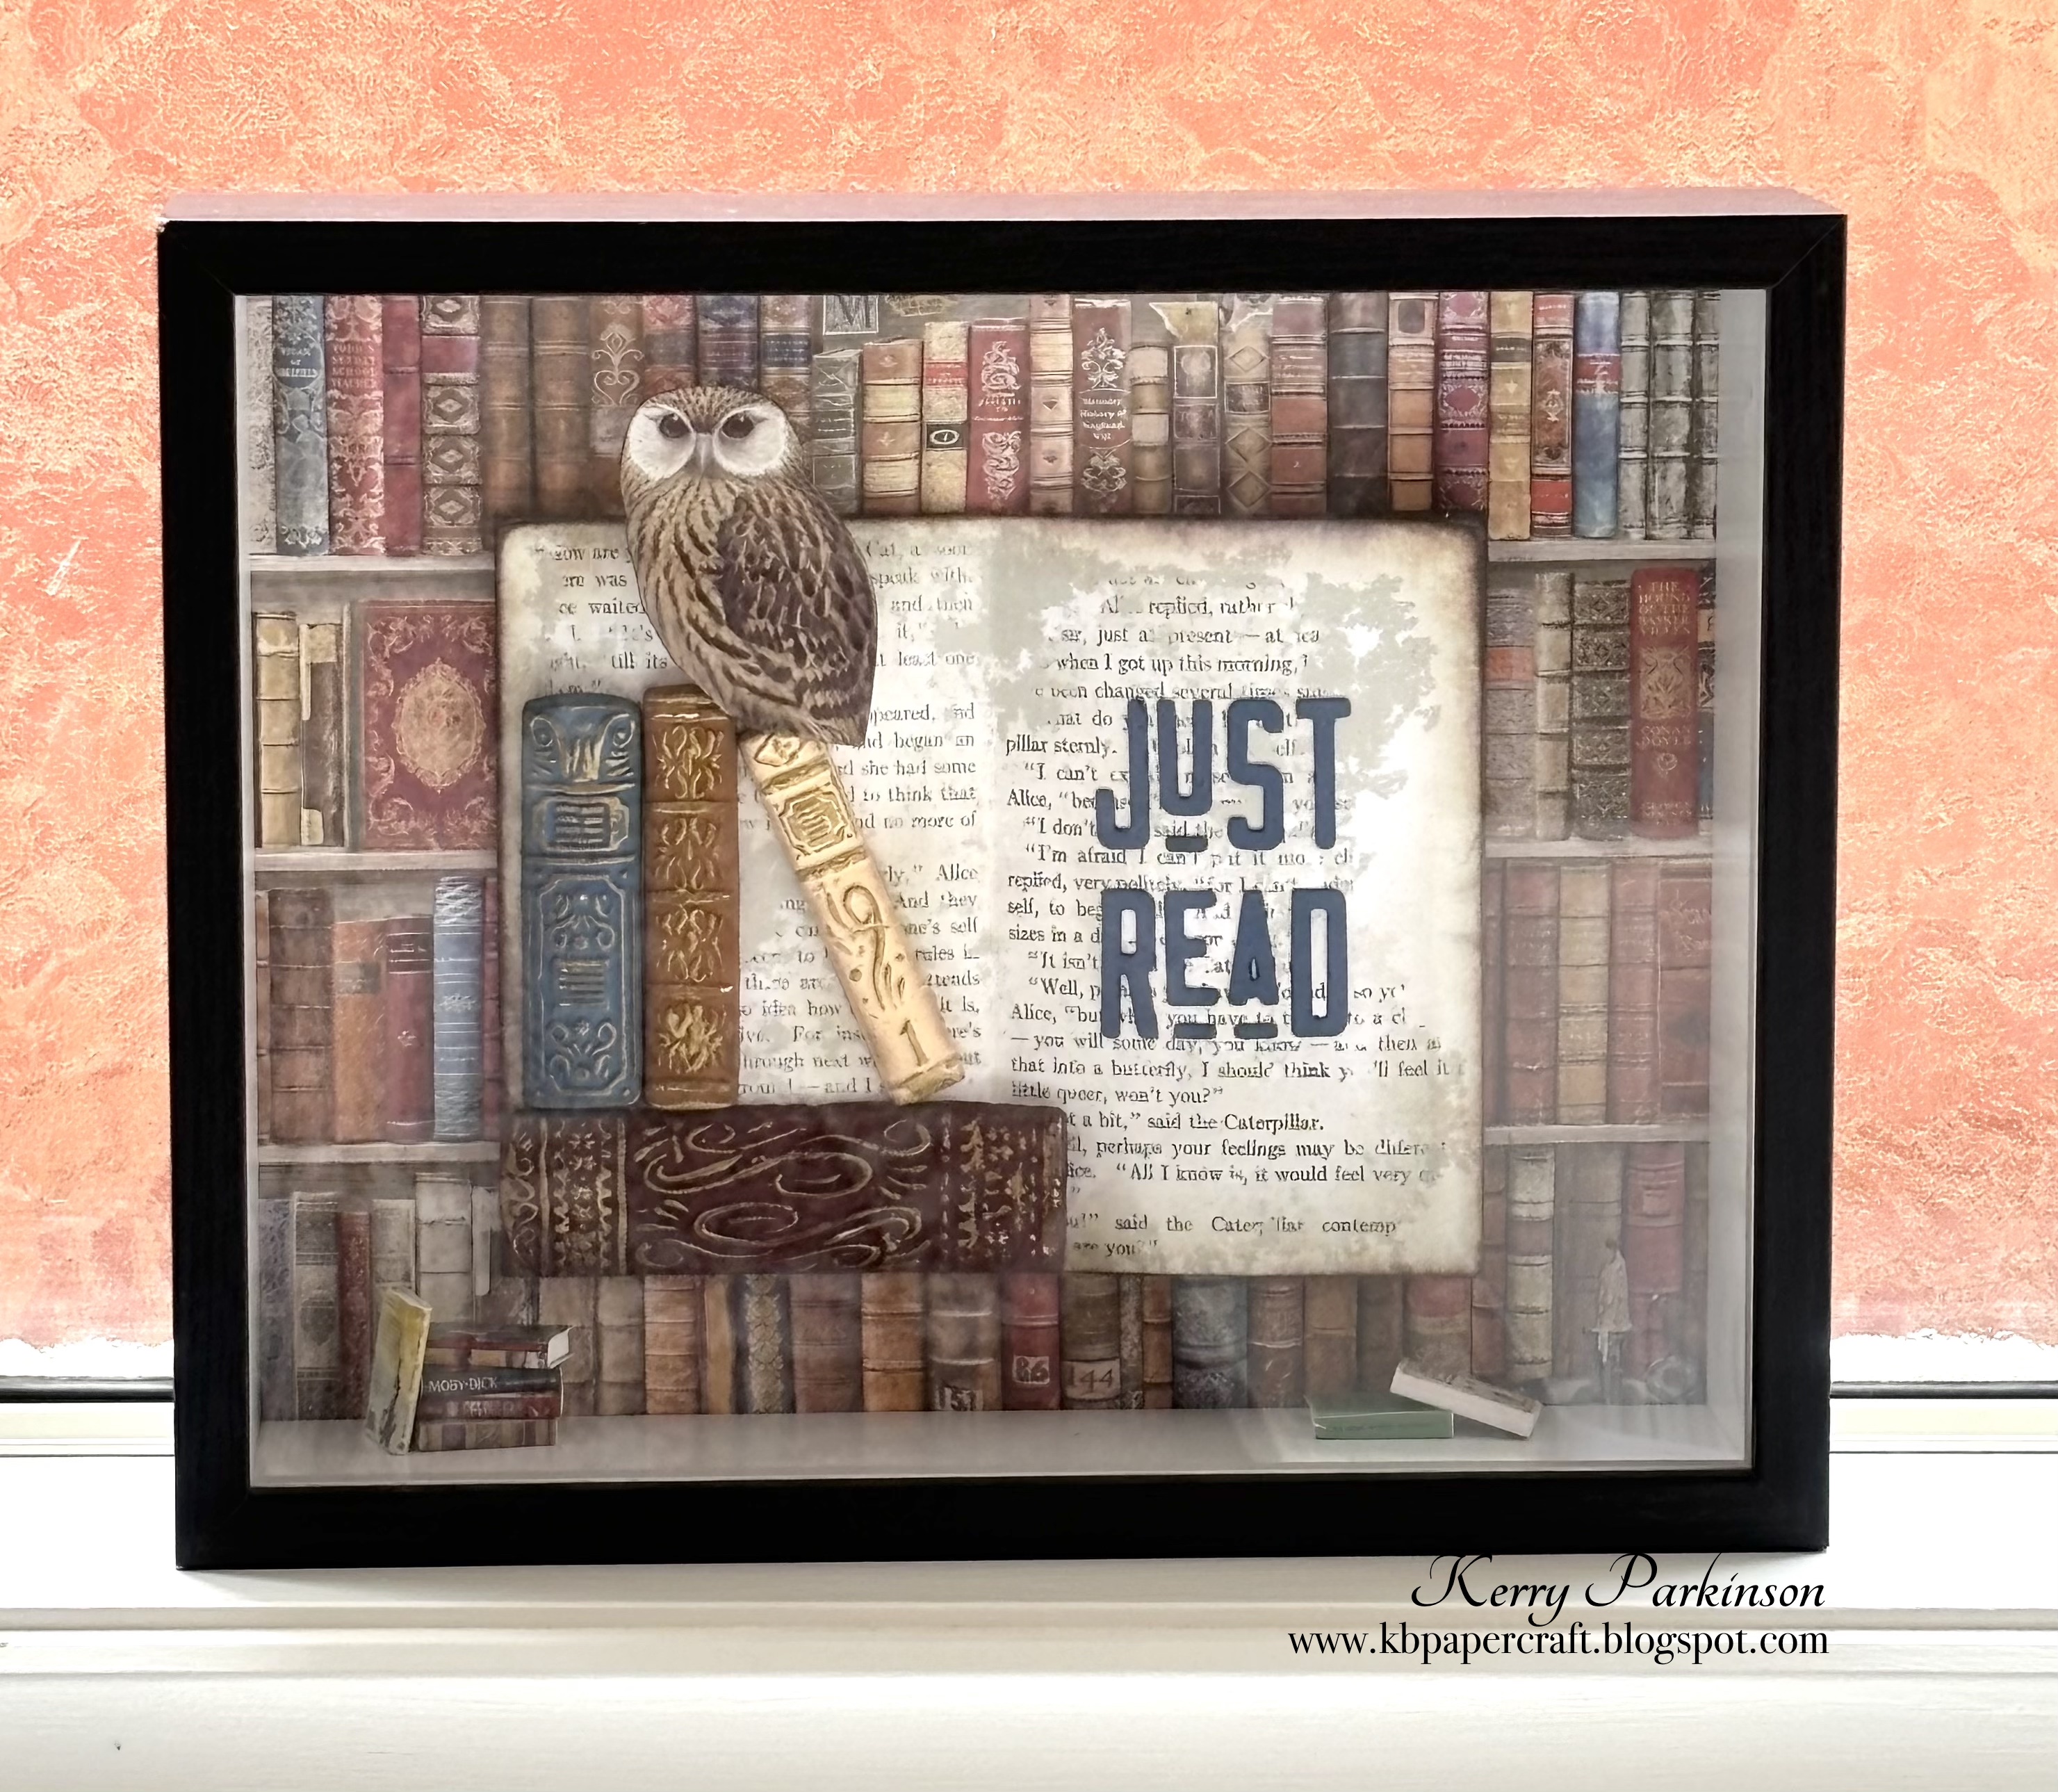
A number of years ago (we're talking more than 10 years, ohmygosh) Just Add Ink had a challenge to be inspired by the wrapper colours of our favourite chocolate bar (yep, they seriously expected us to pick just one, lol). I was lucky enough to win that challenge, so the bar is set high to best that mouthwatering winner, lol! As luck would have it, I not-so-long-ago scooped up a number of items from Stamperia's Coffee and Chocolate range - serendipitous, right? You betcha whipped ganache! Here's my card, which I feel is perfect for many occasions (and do try not to drool all over your keyboard!):

Mm mm mm m mmmmm... 

BTW, while much fun was had, sadly no chocolate was consumed in the making of this card. I know, I know - I really didn't plan that terribly well, lol. 

Materials used:
  • stamps - Sentiment Strips 2 (Altenew)
  • card - basic white, early espresso
  • Stamperia Coffee & Chocolate collection - stencil, paper and Collectibles
  • distress oxide inks - Victorian velvet, vintage photo
  • other - white gesso, distress opaque texture paste, craft foam, MISTI, Sidekick, blending brushes, sponge dauber, creamy caramel ink (retired), fan brush, water spritzer, Nothing's Better Than die (SU retired)

I started by applying some texture paste through the stencil, inking once it was dry. The 'chocolate' die cut word has three layers, darker behind for a bit of shadowing and lighter on top - I even dredged out a very old ink pad to try for a close colour match. The cupcake and chocs were fussy cut and sponged around the edges then raised at different levels for dimension. The splatters are watered down gesso and I couldn't resist using paper with just blocks and blocks of choccy over my base card.

Check out some more chocolatey creations on the Just Add Ink blog and if you're inspired to make, we'd love to see your work in our gallery.

I'm entering this card in this week's Color Throwdown challenge.

Thanks for stopping by.

Cheers
Kerry

Monday, March 25, 2024

Happy Easter, Mr Rabbit

I'm sure you've probably met the very dapper Mr Rabbit already if you haunt blogs, Pinterest or social media like I do. He joined me a week or so ago but I have been saving him for closer to Easter and now it's almost here I happily sat and became acquainted with the gentleman. Here's how our first meeting went:

I began by stamping him on two pieces of Tim Holtz's specialty stamping paper so I could get the crispest, clearest image. One of those pieces became my background, which I sponged over with distress ink and did some stamping with other stamps from the set. The second piece I coloured using distress watercolour pencils then restamped - this brings back any detail lost because of the pigment from the pencils - before fussy cutting him out and attaching over the first piece. I die cut some eggs in different sizes then coloured those with distress inks, stamping dots over the top with oxide ink and sponging the edges. The plaid stamp was used on my base and then I assembled all my layers. 

Materials used:
  • stamps - Mr Rabbit (Tim Holtz), Create Happiness - Elements (Stamperia)
  • card - Distress specialty stamping paper (Tim Holtz), mossy meadow (Stampin' Up)
  • dies - Nesting Eggs (Waffle Flower)
  • other Tim Holtz products - distress inks, distress watercolour pencils, water brush, antique linen and vintage photo oxide ink, ground espresso archival ink, vintage photo archival ink
  • other - blending foam tools, sponge dauber, Dimensionals, craft foam, mossy meadow ink (SU)

I'm entering this in the Simon Says Stamp Wednesday challenge (Easter/Spring), Sunday Stamps #331 Easter Bounty (I used pink, yellow and brown), and Tic Tac Toe #243 (I used the top horizontal row - Easter eggs, yellow and free). 


Luckily there's still time for more meetings with Mr Rabbit before Easter is upon us, so I'd better get hopping! Thanks for moseying on by.

Cheers
Kerry

Friday, March 22, 2024

Love Every Minute

I'm back again with another entry for The Color Throwdown challenge - just kept getting ideas for these gorgeous colours - and this time I'm incorporating it with a second challenge, Inspired By.


And here's my card:


The flowers and leaves are watercoloured and I set them on some distressed woodgrain card for subtle, organic texture. 

Materials used:
  • stamps - Do What You Love (Pinkfresh Studios)
  • dies - Wildflower Stems 1 and 3 (Tim Holtz)
  • other - woodgrain cardstock (Tim Holtz), Zig Clean Color real brush markers, water brush, distressing tool, Dimensionals, craft foam, Big Shot, opal rounds, white baker's twine, sponge dauber

Thanks for calling in.

Cheers
Kerry

Just Add Ink #694 - Just Add a Colour Combo

Who loves colour? Meeeeeeeeeee!!!! Woo hoo, it's time for a colour combo challenge with Just Add Ink and here's what we have for you this week:


I gotta say, this particular combo was a true challenge for me because in a month of Sundays I would not have thought to put these three colours together. Peacock and Cajun, sure, both bold beautiful autumnal tones from the same colour family - but to add fresh freesia? Nikki sure wanted to test us all when she picked these!

That being said, however, once I (finally!) settled on a design idea and began colouring, I came to like this unusual pairing. For me it was all about balance and how much space I let each colour take - the softer freesia could easily be overpowered by the darker tones. Here's how my card ended up:


I started with cutting my freesia base then used the same card for my back layer but darkened it by inking around the edges with matching ink. I sponged some more freesia on my white foreground and gave that some water splatters, letting them dry naturally so I'd get that lovely dark ring around the edges of the drops. My adorable little chameleon was watercoloured and I have to admit to going through a few trial runs before settling on this one, lol. I stamped my sentiment, added some gems and called it good!

Materials used:
  • stamps - Colour My World (Clearly Besotted)
  • card - fresh freesia, basic white (Stampin' Up), watercolour
  • other - blending brush, aqua painter, MISTI, Dimensionals, craft foam, SU markers, clear gems

Why not try your hand at this fascinating combination too - you may surprise yourself just as I did! And it goes without saying that we'd love to see your creations in our gallery. Now head on over to the Just Add Ink blog to see what my fellow team mates did with them!

Thanks for dropping by.

Cheers
Kerry

Thursday, March 21, 2024

I Meant to Behave...

I'm playing along with the Color Throwdown challenge this week.


Isn't that picture adorable? I so want to cuddle some baby ducks right now, lol. Anyways, back to card making business! I used the colours as backgrounds for some just as adorable but definitely-up-to-mischief cats.


I think that snarky sentiment is just perfect for this lot! 😂

Materials used:
  • card - basic white, basic black
  • dies - Postage Collage (Waffle Flower), cats (stash)
  • stencils - Postage Collage Everyday (Waffle Flower)
  • distress oxide inks - spun sugar, squeezed lemonade, shabby shutters
  • other - blending brushes, Big Shot, Small Talk Snarky stickers (Tim Holtz), mounting foam, Dimensionals

Thanks for calling in!

Cheers
Kerry

Friday, March 15, 2024

Just Add Ink #693 - Just Choose Two

Welcome to another Just Add Ink challenge. This week it's a choose two option, with your choices between

Here in the southern hemisphere March heralds the beginning of my favourite season of the year, autumn. Recently I noticed that one of my nearby neighbours had a crop of beautiful yellow sunflowers in their front yard and the cheerful, happy 'faces' not only made me smile but also inspired my card featuring autumn colours and sunflowers, with my 'choose two' options being squares and circles. 

For my background I did some ink blending with oxides and after dry embossing, inked over the raised areas with another oxide. To preserve the vividacity of the colours I smooshed some distress micro glaze over everything. My window frame got some distressing treatment and ink, then I added the sunflowers (which were already made up in my stash) and attached them all to my background. I made some little bunches of sisal threads and added those, splattered with vanilla and gold paints and lastly added a sentiment. 


Materials used:
  • card - blackberry bliss, very vanilla, basic white (Stampin' Up)
  • distress oxide inks - fossilized amber, ripe persimmon, candied apple, seedless preserves
  • other Tim Holtz products - baseboard window frame, ground espresso archival ink, metallic sticker, blending tool, micro glaze
  • other - floating foliage 3D embossing folder (Altenew), sunflower dies (Simon Says Stamp), Big Shot, fan brush, Dimensionals, craft foam, sisal thread, distressing tool, sanding block, sponge dauber, blending brushes, stitched rectangle die

There are more cards to inspire you over on the Just Add Ink blog. I do hope you'll join us and thanks for stopping by.

Cheers
Kerry

Wednesday, March 13, 2024

The Card Concept #205 - Spring Has Sprung


While we look forward to cooler temps here in Australia, the northern hemisphere is warming up and loving all the beauty nature brings with it in Spring. Spring Has Sprung is the theme for this month's inspiration challenge at The Card Concept and what a beautifully sweet mood board we have for you.

The birds, florals and colours all inspired my shaped layered card.


There are three layers of the 'hello' die for depth and I cut the little bird from the reverse side of the DSP to perch there. It's the perfect size and isn't it adorable? This card is 14cm tall and just 10.5cm at its widest point, so fits in a regular C6 envelope. 

I repeated some of the papers on the inside and left space for a handwritten message.


Materials used:
  • card - boho blue, basic white, Flight & Airy DSP (all Stampin' Up)
  • dies - hello script (stash), Bird House A2 cardbase (Honey Bee Stamps), Essential Arches (Spellbinder)
  • other - Big Shot, blending brushes, Dimensionals, sponge dauber

Check out what my fellow team members have created to inspire you over on The Card Concept blog, and thanks so much for stopping by.

Cheers
Kerry

Friday, March 8, 2024

Just Add Ink #692 - Just Add a Sketch

Hey stampers, it's time for another Just Add Ink challenge and this week we have a great sketch:


I've used a movie theme for my card - my family are all avid movie watchers and elder DD and her partner especially are fabulous at movie trivia. As a new mum, she's also enjoying the Mums and Bubs sessions at her local cinema.


And on the inside I put a pocket just perfect for a movie gift card.


Materials used:
  • card - basic white, basic black, real red, gold foil, starry sky (Stampin' Up), Silverscreen papers (Nitwit Collections)
  • dies - Movie Icons (My Favorite Things), stars thinlits (Stampin' Up)
  • other - Copic markers, Dimensionals, Big Shot, Gardenia Filmstrip Frames (49andMarket)

What would you make with this sketch? We'd love to see your creations in our gallery. You can check out more ideas to inspire you over on the Just Add Ink blog. 

Thanks for dropping by.

Cheers
Kerry


Saturday, March 2, 2024

Wishing You Luck

Can you believe March is here already? Yikes!

On the plus side, the March challenge over at Simply Clean & Simple to make a CAS card with an optional additional theme of 'Green' did spark an idea ... 


Plenty of ink smooshing to keep me happy here, lol, for both the background and die-cut lettering, which is three layers for depth. 

Materials used:
  • stamps - Bitty Buzzwords: Seasons (Honey Bee Stamps)
  • card - kraft, watercolour
  • dies - Bold Text 2, Tailored (Tim Holtz), Curio: Spring findings (The Greetery), stitched rectangle (Paper Rose)
  • distress oxide inks - mowed lawn, rustic wilderness, spiced marmalade, ripe persimmon
  • other - Big Shot, MISTI, crackling campfire archival ink, water spritzer, heat tool, blending brushes, Dimensionals, craft foam, clear sequins, mini glue dots

Hope you get some crafting in your day! Thanks for stopping by.

Cheers
Kerry